腾讯云服务器学习笔记
1、卸载监控
# 运行 Stargate 的卸载脚本
/usr/local/qcloud/stargate/admin/uninstall.sh
# 运行 YunJing 的卸载脚本
/usr/local/qcloud/YunJing/uninst.sh
# 运行 Barad 的卸载脚本
/usr/local/qcloud/monitor/barad/admin/uninstall.sh
# 使用 systemctl 停止 tat_agent 服务
systemctl stop tat_agent
# 使用 systemctl 禁用 tat_agent 服务,这样它不会在下次启动时自动运行
systemctl disable tat_agent
# 删除 tat_agent 的 systemd 服务文件
rm -f /etc/systemd/system/tat_agent.service
# 使用 ps 和 grep 命令查找所有名为 'agent' 的进程
ps -A | grep agent
# 删除 /usr/local/qcloud 目录及其子目录和文件
rm -rf /usr/local/qcloud
2、腾讯云windows卸载监控
除了官方文档中提及到的还需要停止tat_agent服务,以及卸载腾讯云鼎。最后删除qcloud文件夹即可。
3、腾讯云卸载监控补充资料
4、腾讯云国内vps设置xray
# 下载xray压缩包
curl -fsSL https://ghproxy.com/https://github.com/XTLS/Xray-core/releases/download/v1.8.4/Xray-linux-64.zip -o xray.zip
# 解压缩
unzip xray.zip -d xray
其余见github 私有gist。
5、腾讯云设置clash
# 使用 wget 下载 clash 的 Linux amd64 版本 v1.18.0 压缩文件
# clash删库,下面链接已失效
# wget https://ghproxy.com/https://github.com/Dreamacro/clash/releases/download/v1.18.0/clash-linux-amd64-v1.18.0.gz
# 使用wget下载clash meta内核
wget https://gh-hk.gujiakai.top/https://github.com/MetaCubeX/mihomo/releases/download/v1.17.0/mihomo-linux-amd64-v1.17.0.gz

# 使用 gunzip 解压下载的 gz 文件
# gunzip clash-linux-amd64-v1.18.0.gz
gunzip mihomo-linux-amd64-v1.17.0.gz

# 修改名字
mv mihomo-linux-amd64-v1.17.0 clash-meta

# 使用 mv 将解压后的 clash 文件移动到 /usr/local/bin/ 目录并重命名为 clash
# mv clash-linux-amd64-v1.18.0 /usr/local/bin/clash
# 将clash-meta移动到/usr/local/bin文件夹
mv clash-meta /usr/local/bin/

# 切换到 /usr/local/bin 目录
cd /usr/local/bin

# 使用 chmod 为 clash 文件添加执行权限
# chmod +x clash
# 使用 chmod 为 clash-meta 文件添加执行权限
chmod +x clash-meta

# 切换到 opt 目录
cd /opt

# 创建一个名为 clash 的文件夹
mkdir clash

# 切换到新创建的 clash 文件夹
cd clash

# 下载 Country.mmdb 文件,用于地理位置识别
wget https://gh-hk.gujiakai.top/https://github.com/Dreamacro/maxmind-geoip/releases/download/20231012/Country.mmdb

# 克隆 clash-dashboard 的用户界面
# git clone -b gh-pages https://gh-hk.gujiakai.top/https://github.com/Dreamacro/clash-dashboard ui
# 克隆私房菜机场到yacd面板
# git clone -b gh-pages https://github.com/kogekiplay/Yacd-meta ui
git clone -b gh-pages https://gh-hk.gujiakai.top/https://github.com/kogekiplay/Yacd-meta ui
# 克隆clash-meta官方的yacd面板
# git clone -b gh-pages https://gh-hk.gujiakai.top/https://github.com/MetaCubeX/Yacd-meta.git ui

# 或者下载gh-pages分支的zip压缩包,接着解压缩即可。
wget https://gh-hk.gujiakai.top/https://github.com/MetaCubeX/Yacd-meta/archive/gh-pages.zip
wget https://gh-hk.gujiakai.top/https://github.com/Dreamacro/clash-dashboard/archive/gh-pages.zip


# 使用 wget 下载并重命名 clash 配置文件
wget clash订阅链接 -O config.yaml

# 使用 vim 编辑 config.yaml 文件,添加相关配置
vim config.yaml

# allow-lan: true
# 添加以下内容
external-controller: :9090
external-ui: /opt/clash/ui
secret: passwd

# 使用 vim 创建并编辑 /etc/systemd/system/clash.service,用于设置 clash 服务
# vim /etc/systemd/system/clash.service
# 添加以下内容
# [Unit]
# Description=Clash daemon, A rule-based proxy in Go.
# After=network.target

# [Service]
# Type=simple
# User=root
# ExecStart=/usr/local/bin/clash -d /opt/clash/
# Restart=on-failure

# [Install]

# 使用 vim 创建并编辑 /etc/systemd/system/clash.service,用于设置 clash 服务
vim /etc/systemd/system/clash.service

# clash-meta的系统服务
[Unit]
Description=Clash Meta daemon, A rule-based proxy in Go.
After=network.target

[Service]
Type=simple
User=root
ExecStart=/usr/local/bin/clash-meta -d /opt/clash/
Restart=on-failure

[Install]
WantedBy=multi-user.target

# 重启内核
systemctl daemon-reload

# 设置clash开机自启并且立即启动clash
systemctl enable --now clash

# 启动 clash 服务
systemctl start clash

# 查看 clash 服务状态
systemctl status clash

# 设置环境变量,配置 HTTP 和 HTTPS 代理
export http_proxy="127.0.0.1:7890"
export https_proxy="127.0.0.1:7890"

export http_proxy="127.0.0.1:7890"
export https_proxy="127.0.0.1:7890"

# 设置系统代理为 SOCKS5,代理地址为本地的 127.0.0.1,端口为 7891
# 用于设置环境变量 ALL_PROXY,使得所有支持此变量的程序都会通过指定的 SOCKS5 代理进行网络连接
export ALL_PROXY=socks5://127.0.0.1:7891

# 使用 curl 测试代理设置
curl google.com
curl ipinfo.io/json
6、切换腾讯云的软件源
vim /etc/apt/source.list
vim /etc/apt/sources.list

# 注释掉腾讯云的软件源,更换为linux发行版官方的软件源。
# 国内的机器更新软件包列表之前,需挂上代理,否则更新速度缓慢。
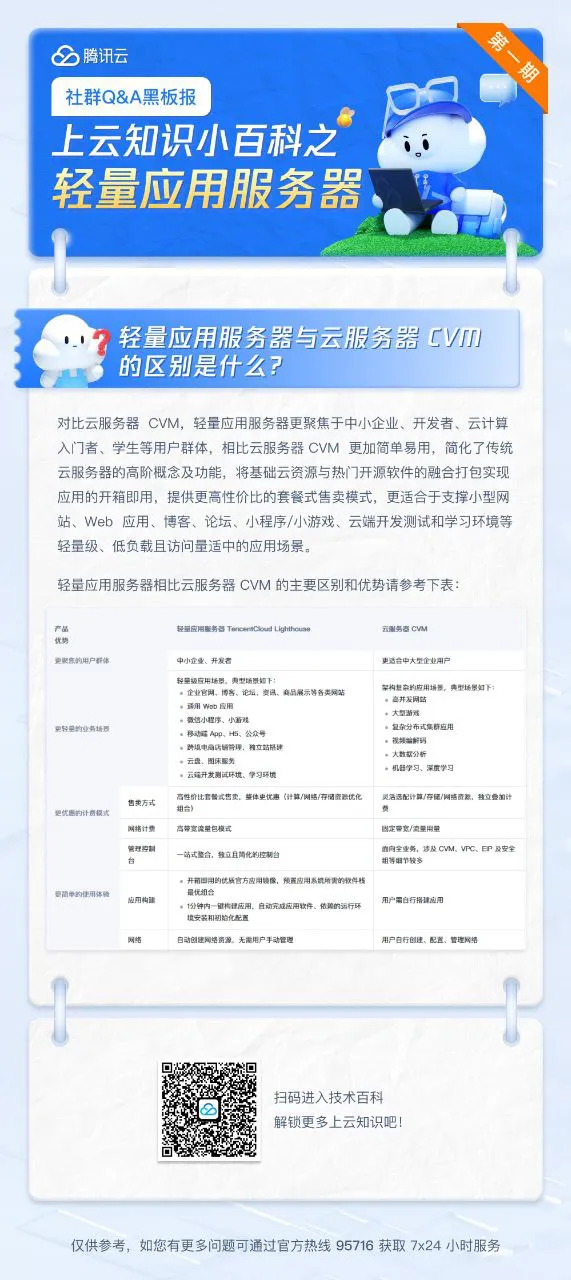
7、轻量应用服务器 vs CVM服务器
8、虚拟主机 vs VPS vs 云服务器